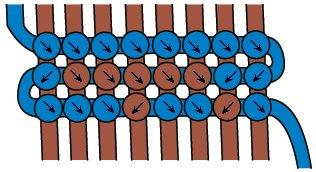
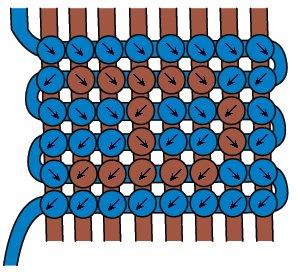
This tutorial should teach you how to make patterns (also called Letter-, alphabet- or cross-sti
tch patterns)
. These videos below shows you how to do it while the rest of the tutorial tries to explain it.
In this tutorial, I will show you how to make the letter A on a bracelet. You may replace the letter A by any other letter (see letter examples further down in this tutorial)
.
Step 1

For this pattern, you will need 8 strings in the letter color, and one in the backgroun
d color.
Step 2

Start with the blue string to the left and make eight right-kno
ts on top of each letter string. This will be the first row of the pattern in the letter A (see step 1).
Step 3

Use the same string but change direction and make two left-knot
s. When you get to the third knot (counting from the right), the A pattern tells us it shall be a brown knot there instead of blue. Just take the brown thread in question and make a left downward knot "on top of" the blue one. You can also see it as making a forward knot just that you have tilted the pattern 45 degrees.
Step 4

In this way you can choose color of the next knots. Follow the pattern in step 1 until row 2 is finished.
Step 5

Change direction again and make row 3. Tie right-kno
ts to make blue knots and downward knots to make brown ones. Follow the pattern.
Step 6

When you've finished the first letter, you can continue with the next. You find suggestio
ns for letters below.
Example alphabet letters


